Overlord
once you take the back plannels off, you expose a big metal I bar , 2 sholder block and the arms,
you need to dismantel the arms to remove the sholder blocks.
paul is reasembling his max top half now so hes takeing photos for you witch wil lhelp a bit better.
paul also sayed to take the pins out (his was starting to rust and did go rusty more) so best advice is to remove them just to be safe .
yellowing the test
Moderator: Jose


That looks like such a daunting undertaking 
Much thanks to you and your buddy for the photos however...I'll def be saving these to my comp for use as reference and the like
I treated the parts I mentioned last week but as luck would have it i misplaced the usb cord that connects my camera to my machine, so i'll have to post some pics a bit later on!
However I will say that some parts stubbornly refused to show further improvement after two days' treatment in the 3% bath...I will probably opt for 35% soon, especially for my jetfire which is a heinous shade of dark yellow.
once again thanks for the fort max pics catgut, and the technique about the iron dowel/rod removal. I'll have to go to the hardware store tomorrow and pick some tools up, as things have been closed here for july 4
oh boy yer paul sayed he was a task and some more, but well worth it (hes now finished his with stickers aplyed too) i wil lpost finished photo as soon as i get them.
also no problem about the help (from both me and paul) this is one of the main reasons im here .
.
i look forward in seening your results too (please just be careful with the 35% lol remember the cloves, also remember to steep the parts treated in cold water for about 30 mins before handleing with out clove just to be on the safe side )
also no problem about the help (from both me and paul) this is one of the main reasons im here
i look forward in seening your results too (please just be careful with the 35% lol remember the cloves, also remember to steep the parts treated in cold water for about 30 mins before handleing with out clove just to be on the safe side )

Ok....got some good news and bad news...
Good news....This method works Fantastic on white or lighter colored plastics.
Bad news....It unyellows colored plastic....but it faded the color significantly.
I just took a the purple pieces to a Blot figure that I had that was pretty yellowed out of it's second bath. At first glance it looked great. When rinsed and dried and compared to the other parts....it is a bout 2 shades lighter purple
So just a word or caution....I would only use this on white parts

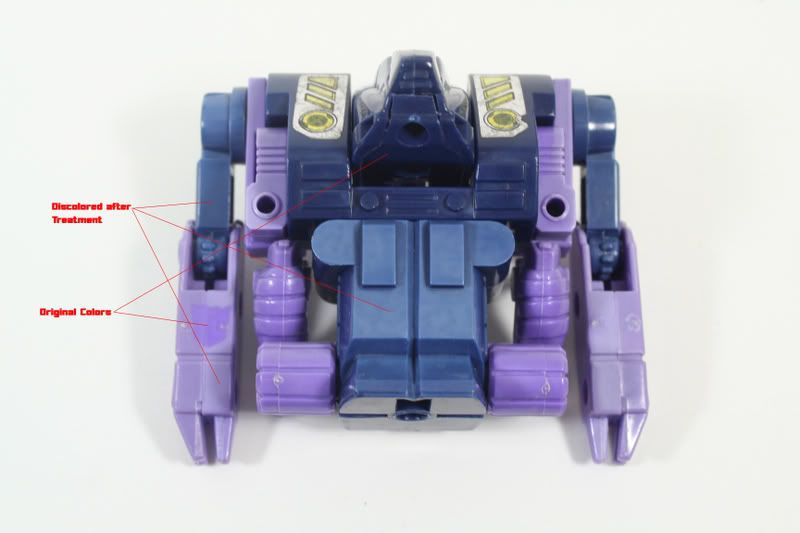
im sorry to hear this has happended to you with blot , would you post a photo of it , so far weve had no problem with colour plastics (battle trap, fly wheels, inferno and the other coloured bits), even fort max above ? only problem im come across so far is with the slugslinger where it was to far yellowed (it lightened it but not all the way ).
im also doing triggerhappy and so far this hasent happended to me.
what strength of H202 are yer useing ? also how long did you soak it ?.
ill ask paul about this reaction too (it is posable it could be the plastic was too yellowed and steeped to long?)
im also doing triggerhappy and so far this hasent happended to me.
what strength of H202 are yer useing ? also how long did you soak it ?.
ill ask paul about this reaction too (it is posable it could be the plastic was too yellowed and steeped to long?)
this is forty now finished (both light and dark plastics treated )
before repo stickers

after stickers


the way it sounds is the part was steeped to long without removeing,rinsing and drying before steeps (as i wrote earler i advise the item to be checked ever 30mins if it looks as though theres change take it out and rinse/dry if it need more steep and repeat) its on page 1.
when the items getting treated youll see a change but youll only see the end change once its dryed after rinsing.
paul added (yep i readly do chase things up for yous )
the problem appears to be that the yellowing makes the original colour darker. When the peroxide lightens this it goes beyond the original colour and can appear blotchy . In my experience when this happens the blotchy ness is very light and can be removed by using a metal polish such as brasso
i will be posting photos of triggerhappy soon (arms still need finishing)
before repo stickers
after stickers
the way it sounds is the part was steeped to long without removeing,rinsing and drying before steeps (as i wrote earler i advise the item to be checked ever 30mins if it looks as though theres change take it out and rinse/dry if it need more steep and repeat) its on page 1.
when the items getting treated youll see a change but youll only see the end change once its dryed after rinsing.
paul added (yep i readly do chase things up for yous
the problem appears to be that the yellowing makes the original colour darker. When the peroxide lightens this it goes beyond the original colour and can appear blotchy . In my experience when this happens the blotchy ness is very light and can be removed by using a metal polish such as brasso
i will be posting photos of triggerhappy soon (arms still need finishing)
ouch that reaction looks pritty bad for the time limit , could be the figure was so badly yellowed its took the yellowing out and the dye, but in all the items witch weve done , the only one for me was slugslinger (the yellowing didnt come out all the way) and pauls jaw breaker which was left in to long but not over long and the change was easly rubbed out with brasso, you might get a bit of result doing this to blot, but looking at the reaction it might take a few gos (put the brasso on and leave it to dry then rub off give a good effect)
ive also do a few tests to see if this dose happen (about the figure part been over yellowed) and i belive this is the case (and my results)
these parts are the triggerhappy blue bits after treatment (these were quite yellowed and has turned the blue very dark)

this is a close up on the face (were the plastic is painted, which hasnt damaged any paint)

this is a close up of the back plate

ok pritty normal reactions and results are what was expected.
now this its the intresting part for yer (i hope this helps a bit too)
now i found the worst part i could (this case joy rides gun), i steeped it far to long, and in direct sun though out the day, for 3 days, by itself in the jar)
hers the results


pritty big change eh ?, well might be suprised to here these are BOTH are photos and same gun, the reason this has happened is because one side of the gun was that yellowed it was near black (this is the reason the gun on one side has turned a lighter white than the blot )
but this was taken just to show the effect the brasso has (its not finished i just did a quick clean of it )

so i think if the figure is to far yellowed it can have that reaction on any thing coloured and over yellowed
ive also do a few tests to see if this dose happen (about the figure part been over yellowed) and i belive this is the case (and my results)
these parts are the triggerhappy blue bits after treatment (these were quite yellowed and has turned the blue very dark)
this is a close up on the face (were the plastic is painted, which hasnt damaged any paint)
this is a close up of the back plate
ok pritty normal reactions and results are what was expected.
now this its the intresting part for yer (i hope this helps a bit too)
now i found the worst part i could (this case joy rides gun), i steeped it far to long, and in direct sun though out the day, for 3 days, by itself in the jar)
hers the results
pritty big change eh ?, well might be suprised to here these are BOTH are photos and same gun, the reason this has happened is because one side of the gun was that yellowed it was near black (this is the reason the gun on one side has turned a lighter white than the blot )
but this was taken just to show the effect the brasso has (its not finished i just did a quick clean of it )
so i think if the figure is to far yellowed it can have that reaction on any thing coloured and over yellowed
-
Rumble
- Decepticon Demolitions Expert
- Posts: 1884
- Joined: Thu Jul 26, 2007 12:51 pm
- Location: Micro-Cassette Recorder
From the pictures above I guess you are using the wadding cloth Brasso. I wonder if the liquid Brasso would do the same job? If I ever get round to giving this method a go I will post up any results I get with liquid Brasso.
Rumble.
Rumble.

R.I.P, Menasor.
I can't believe I thought Cassettes were the way of the future.
Is +1 on Kups list.
'Cons Have More Fun
lol nar if them blooming yellow duster  there threads get everywere, this is the liquid brasso in the metal tin but you could use the wadding gear too(lol failing that just use t cut dose the same sort of job) best thing with useing the brasso like it leaves a nice shine figure .
talking of nice shine things
this is deadwing complete with repolables added.


talking of nice shine things
this is deadwing complete with repolables added.
-
Minerva
- Nurse to Die For
- Posts: 3212
- Joined: Fri Oct 19, 2007 1:17 pm
- Location: Transformerland-North HQ
I realize that this is an old thread, but recent topics have made me curious about the use of hydrogen peroxide:
I would relly like to attempt using this on some of my figures as well, but before I do I'd like to know a bit more about it. So, to all of you who have already tried it: have you noticed any long-term effects on an of your figures (not only decoys)?Time Traveller wrote:Have you seen any long-term effects on your first projects yet? remission of the discoloration, or surface damage, or hardening of the rubber decoys?


The leg of the figure I tried on had painted toes, and they looked fine after. Although I don't have the other foot to compare to an untested one.
Personally I'm not worried about damaging yellowed ones. What difference does it make if the colors end up too light rather than too dark? Such figures already reside in my parts box. They can only get better.
If you are concerned about the rest of the figure try taking off the yellowed parts and only dunk them. That'll resolve the metal rusting issue too.
The metal half of the calf is yellowed? I have a broken jetfire thats yellowed but the metal pieces are untouched. Only the plastic half of the calf changed.
I tend to doubt peroxide would help. Aside from possibly damaging the metal peroxide didn't seem to effect the paint on my figure. You might just have to repaint them. Personally I'd just buy a broken white one from ebay and swap out parts.
I tend to doubt peroxide would help. Aside from possibly damaging the metal peroxide didn't seem to effect the paint on my figure. You might just have to repaint them. Personally I'd just buy a broken white one from ebay and swap out parts.
Well I'm waiting for transformers to install on my PS3 so I snapped a few shots of my whitening test. And I even found an original color leg to compare.

As you can see its much better after.

Seems to be restored to the original white.

But it did slightly effect the painted toes. They still look good though. And far better they be lighter than it be yellowed. Also that foot soaked for 2.5 days. I had to keep turning it over so the other sides were in the sun. I found that after the first dip the bottom side hadn't whitened as much as the top.
As you can see its much better after.
Seems to be restored to the original white.
But it did slightly effect the painted toes. They still look good though. And far better they be lighter than it be yellowed. Also that foot soaked for 2.5 days. I had to keep turning it over so the other sides were in the sun. I found that after the first dip the bottom side hadn't whitened as much as the top.